Hello, friends!
I'm happy to report several things:
1. Most all leftover wedding items and post-wedding move-in (for the groom) is taken care of put away (uhh...the stuff all over the garage doesn't count, right?!)...or I'm just used to seeing things in the places they now reside. This means more time for more projects and focusing on making this little house a lovely first home for us.
2. Our small group from church met at our house last week...which prompted most of #1.
3. Our WEDDING PHOTOS ARE BACK!!!!! Meaning, you, my lovely friends, are going to start seeing lots of wedding-related tutorials, just in time for those of you planning a wedding for this spring/summer. Lots of ideas coming your way! If you're interested in another sneak peak, see our photographer's blog. (Yes, you want to see this.)
Ahem, anyway, back to the post for today. Since I've recently found myself "void" of projects (no, that's not really true. My brain is ALWAYS thinking of new projects.), I thought I'd tackle one wall of my kitchen. I had seen these done several different ways (and have done them a different way, in fact, for a bridesmaid gift) like painted silver to look like metal or like Restoration Hardware knock-offs, but I wanted to do mine just slightly different (and original--to me, at least).
Here is my end result!
I started with three paper maché letters from JoAnn's (that just happened to be 30% off for $2 each)...then I started roaming around the store and landed in the scrapbooking aisle, where I found this awesome pressed/textured paper (which also happened to be 30% off for $.69 each). Seriously, you guys...this paper rocks. It's a shimmery, metallic-y gold that has the greatest texture pressed into it. It looks like sheets of patterned metal, like this. I really think angels sang when I saw it and held it up to my paper maché letters. (Don't you love when you get inspired and a project just comes together??)
I flipped it over and traced my letter, leaving enough excess to wrap the sides with. If I didn't have enough to wrap the sides entirely (like between the horizontal parts of the "E", I just mod podged another section underneath and then applied the main piece over it, mod podging everything down to be nice and seamless. (Just in case you are confused by the orientation of the paper in the below picture, my E looks "correct," even though it should look backward, because it's upside down. You want to turn your letter over so that you're tracing a pattern for the front--which might look backward. All of my letters just happened to be symmetrical.)
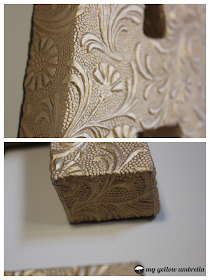
After mod podging everything down (just underneath. I did not apply another layer on top as I didn't want my pattern to look dulled) I let everything dry last night and this is what I had this morning!
Seriously, you guys...I know I keep saying this, but LOOK at the TEXTURE!
(See above for how I wrapped the corners in places where they were least likely to be noticed, like on the bottom of the A.)
As for how I hung them: they're super light, so I shot an upholstery staple into the back and stuck a piece of painter's tape at the bottom to keep it from sliding around (i.e. becoming unlevel...that would never go unnoticed in my house) or getting knocked off of the wall. Pretty professional, eh? ;)
Fills the little space perfectly, just like I was hoping. I actually originally intended on spray-painting these another color--like metallic silver or maybe even an eye-grabbing red, but the more I worked on these, the more the gold grew on me. So, I'll leave them gold for now and we'll see what color they end up after some time.
Total cost: $8.04!
Also, an update on my 2012 goals. I'm three yoga classes in and loving it. It's amazing how relaxed I feel right after class (and how sore I am the next morning!). Second, I'm well into my quilt-planning and material purchasing. I've designed my pattern, I'm waiting on some fabric samples to arrive (who knew charcoal-colored broadcloth would be so hard to find?) and I went ahead and purchased my batting while JoAnn's had it for 50% off this week. Once I decide on a fabric, I just need to purchase it, start cutting pieces, piece it together, baste, quilt it and bind it...ha! No big deal, right?


Love it and cant wait to see how the Quilting goes!
ReplyDeletehttp://wannabegreenash.blogspot.com/
Really love how these turned out Alina!! The texture on the paper is awesome.
ReplyDeleteAlso, I did check out a sneak peek on Jackie's website...WOW!! You looked absolutely stunning girl! You did a fabulous job on everything for your wedding. Can't wait to read about the tutorials!!
I love the letters! They'd be cute for a nursery, too...I'm not very crafty, but I can FOLD! ;)
ReplyDelete